How to Shoot in Manual Mode
- Kevin Lee
- May 5, 2020
- 4 min read
Updated: Jan 9, 2023
Since the stay home order has been extended through May, I wanted to try and help you guys get more comfortable with the camera. Once this all ends, hopefully we’ll all be able to take awesome photos together!
So first thing you have to understand is that there are three settings. Changing one of them results in changing the other two to compensate. So, before even getting into the settings, let’s talk about exposure.
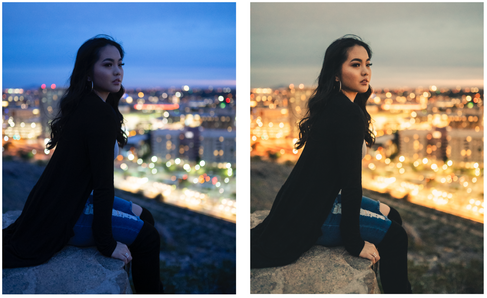
Exposure in simple terms is how bright or dark an image is. A correctly exposed image is one thats balanced in the highlights and shadows. Although you can always fix exposure in post processing, a correctly exposed images is always the best starting point for an edit. Now for example.
Some correctly exposed images:


Some incorrectly exposed images I was able to fix:


There are times where you are going to want to underexpose or overexpose a photo, but to keep it simple let's say you want correct exposure. There are three settings to consider when taking a photo (in no particular order).
1. Shutter Speed
2. Aperture
3. ISO
SHUTTER SPEED


Let’s start with shutter speed. Shutter Speed is how quickly your shutter opens and closes or in other words, how long your sensor will be exposed. The longer the shutter speed, the longer the sensor will be open for, resulting in more light coming in. In addition, the longer the shutter speed means more movements captured. But note, movement is ALWAYS blurry. For example, let’s say you want to take a picture of a bird flying. You will need a faster shutter speed like 1/4000 seconds to capture the bird in flight. If you were to try and shoot the bird flying at 1/50 second, it would have covered so much ground, and flapped its wings a bunch of times, you would not get a clear picture of a bird. Knowing exactly what shutter speed to shoot at to achieved the wanted outcome comes from shooting in many different environments.
While showing the difference in shutter speed is a little bit harder to notice in this example; the faster the shutter, the more motion it freezes. The water taken on 1/1000 sec looks almost frozen in time, while the picture taken in 1/50 looks like the water is still flowing. If you want to stop motion, use a faster shutter speed!
ISO / ASA


Now that you have a shutter speed. You need to pick an ISO. Some cameras might say ASA, but almost all the newer ones will call it ISO. ISO stands for International Standards Organization. The biggest take away from ISO is that if possible the lower the ISO is better. BUT you should not hesitate to bump it up IF your camera can handle it. ISO is another setting that you brighten or darken a photo. ISO will go up in doubles for the most part (100, 200, 400, 800, 1600, 3200, 6400). The reason for wanting to shoot in lower ISO is because less grain/noise is introduced. But again, this is a personal thing. Some people really enjoy the grain , but remember, grain is something you can add in during post processing.
Like previously mentioned, ISO is just another tool to brighten or darken an image. The only thing that changed throughout the images was the ISO. While in the other examples the other settings had to be changed in order to compensate.
F-STOP / APERTURE


Lastly, now figuring out what aperture to shoot in. You know when you take a picture on your iPhone and theres a portrait mode that blurs out the background? The aperture lets you control the DOF (Depth of Field). You want a shallow DOF? Where the background the blurry, but the subject is sharp or vice versa. This is where it gets a little confusing. F-STOP can be used interchangeably with aperture. F1.4 means that you are shooting at an aperture of 1.4 or an F-Stop of 1.4, means the same thing. The lower the aperture the faster the lens. The reason its considered a faster lens is how the aperture setting lets you interact with the other two. Remember how if you want to correctly expose an image, you need to balance those three things? If you’re shooting outside in daylight and shooing at a lower aperture, you would need a faster shutter speed to reduce the amount of light going in, otherwise you will just have a white screen. In addition, the lower the number, the bigger the opening of the lens element to let in more light
As you can see when shooting 1.4, you cant read the text in the background due to 1.4 having an extremely shallow DOF. On the other hand shooting at F8 you could read out the text in the background. If you wanted the text to be clear shooting at a higher aperture would make most sense.
Conclusion
There are an infinite amount of combinations that would correctly expose an image and thats what makes photography so unique. This is where personal style begins. One person might want to use a shallow DOF while another might want to capture the whole scene using a DOF that captures the scene in its entirety. Personally I think that this uniqueness is what makes photography so cool. There could be an endless amount of pictures based off of one original thought. Hopefully you were able to take something away from this, Go out and Shoot! Send me the pictures you guys take!! :)

Comments